 This is Geezer’s CTF Map Making Guide from back in the day. I found it to be relevant to the map making going on today, especially in that Geezer basically walks through how to mirror a map and correct the textures. Here is a link to the original article through the internet archive of PlanetQuake.com…
https://web.archive.org/web/20041204214341/http://www.planetquake.com/3/CTFMapGuide.html  Introduction The purpose of this document is to present some ideas and suggestions on how to make well balanced and popular CTF levels. The goal is to present various ideas and examples to help you create a great CTF map, as well as show how design decisions you make can affect gameplay. While there will be several examples used throughout this document, the purpose is not to say certain maps (or portions of maps) are bad, but rather show how various aspects of the map direct the way the game will be played. This document will not attempt to demonstrate how to make the “perfect” CTF map as opinions will vary on what is perfect. 
Balance The term “balance” will be used a lot throughout this document. I think the most important aspect of a CTF level is balance. Balance comes into play in a variety of ways in a CTF maps, including balanced bases, balanced weapons, balanced item placement etc. Throughout the design process you should always keep everything balanced. This will be discussed in more detail with the various aspects of mapping are addressed. Multiplayer Map Making Basics This section will cover some basic information about making multiplayer maps. While some of these topics are good advice for any type of map, others are specifically geared towards multiplayer maps. 
r_speeds One of the most common problems with maps done by new map authors are high “r_speeds”. Quake & Quake 2 starts to play like molasses when r_speeds get too high. The simplest explanation of what r_speeds represents is the what you, as a player, can currently see (or what the engine is drawing for you to see). There have been a lot of talks and tutorials on reducing r_speeds, so that won’t be rehashed here. The goal is to keep the wpoly portion of the r_speeds output as low as possible. At Team 3 we try to make sure we don’t exceed 600, but if we do it’s only in remote areas. The key is to keep the areas where the most action is as low as possible. There is a big difference between single player maps and multiplayer maps when it comes to r_speeds. With single player maps you, as the map author, can direct how the game will play and hence which areas can afford higher r_speeds. Also, if the player starts to lag because of higher r_speeds, the entire game is lagging along with the player as it’s all being run local. For multiplayer maps, there is a variable amount of players that can be in an area at any given time. It is never known exactly how much action (i.e. how many players) will be playing so the mapper can’t make assumptions. The other aspect to consider with multiplayer maps is that the lag seen by r_speeds are different for everybody as it depends on the player’s hardware. Someone playing with a p100 with no hardware acceleration will lag more than someone with a dual p-2 with dual Voodoo2 cards. Because of this your goal as map author is to always keep the values as low as possible so nobody lags. 
areaportals One common way to lower r_speeds is by using areaportals (func_areaportals). Simply put this is a way to use an entity (embedded in a door) to force the engine to not draw portions of the map that normally would be drawn. This works fine for single player maps (as the gameplay and flow is well know, and the action is pretty much limited to where the player is at the time) but there are some serious problems using these for multiplayer maps. Using “normal” vis blocking techniques what is drawn at any given time is already known by the engine — it is static. With areaportals, the engine must figure out what to draw every time a portal is opened/closed. When you have multiple areaportals the engine must work even harder to figure out what to draw. For those mathematically inclined, the amount of drawing options are 2^n where “n” is the number of areaportals. So if a room has 2 areaportals, there are 4 different drawing options — with 4 areaportals you have 16 options. As you can see it can become quite burdensome on the engine when you start adding a lot of areaportals. In our tests we have noticed an increase in server CPU usage on maps with areaportals. We’ve also noticed an overall sluggish feeling that seems to get worse with more players and over time (i.e. the longer the map is played). Considering what the engine is trying to do it makes sense. The best way to keep r_speeds down is to use normal vis blocking methods — walls and hint brushes. 
Windows Windows (glass) is one those cool features of Quake2 that map authors like to use. There’s a problem though — windows are just plain nasty to those poor souls still in software mode. It isn’t an r_speed hit, but a direct FPS hit. We’ve tested this and have also noticed that where there are a lot of windows it even causes lag for those with hardware acceleration. In our tests we’ve seen FPS drop by over 50% in areas with a single window (from 60 FPS with a Voodoo2 to 26 FPS in software mode). You can test this yourself by doing ‘timerefresh’ at the Quake2 console. Some map authors don’t bother testing their maps in other video modes and just blow off those without hardware acceleration. If the goal is to get more people to play your map why would you want to cause problems for some? It’s best to just avoid windows entirely, but if you must use them then use only a small amount in a small area (i.e. a small window in a hallway). 
Textures A common mistake of new map authors is texture selection. It appears as if they picked some random set of textures and just slapped them on brushes without much thought. This is one area that’s fairly easy to solve, as id has already done some of the work for you. The textures are already grouped by “level sets” right now (i.e. e1u1, e2u3 etc..). The main thing you need to do before starting your map is to have a theme. A theme can be very complex or as simple as “factory level”. This will give you something to keep in mind throughout the development process. If you get stuck on an area or what texture to use, just remember your theme and that should keep you focused. Texture alignment is something a lot of novice map authors seem to have trouble with. Take the time to stretch or shrink your textures so they fit the brush. Having mis-aligned textures will make the best map look unprofessional. Textures are designed for specific purposes. A water texture is designed for water and light textures are designed for lights. When starting out it’s best to use the textures as they are intended to be used. Once you become more skilled in map making you can get a bit more creative.
Item (entity) Angles
Some may consider this a bit extreme, but this something that Team 3 likes to call “attention to details”. Every entity has an angle property, but some map authors only worry about using them on items such as doors (to set which direction the door will open). There are other items where it is very important to set the angle — specifically team start positions (info_player_team1, info_player_team2) and DM spawn points (info_player_deathmatch). For team start positions an easy rule to follow is to have them all point towards the flag. The “attention to detail” comes in on other entities — ammo, health etc. While most players will never noticed whether or not an ammo pack is facing the proper direction, it is very obvious with the megahealth. The “+” on the health is only on one side, and looks rather funny when that is facing a wall. CTF Map Basics This section will cover a few basics that are good to know when starting a CTF map. The best CTF maps are ones that were planned for CTF from the beginning. There have been some popular DM and even SP map conversions, but generally speaking it’s best to start scratch with a CTF map in mind. Symmetrical vs. Asymmetrical The majority of CTF maps that exist today are symmetrical. This (normally) doesn’t mean that the map author was just lazy and didn’t want to do a second base, but has to do with balance. When both bases are identical (aside from color changes) then it’s easy to know that they are balanced. With asymmetrical maps it is much harder to make certain that the bases will be equal. Item placement alone will not automatically make an asymmetrical map balanced. For map authors new to CTF maps it is best to stick with a symmetrical map. If you do wish to attempt an asymmetrical map it will require a significant amount of testing to ensure the map is balanced. Even with this, you always run the risk of players perceiving the map to not be balanced. If players prefer one base over another then you end up with unbalanced teams, or people may simply quit. Again, the goal is to create a popular map and one that is balanced. There is a third type of map that are currently being played. The map appears symmetrical but is altered slightly. An example of this type of map is The Smelter (q2ctf3). The blue base is much more open, and there’s an access hallway to the power shield. This can cause problems as it is easier for the blue team to access the power shield. The tighter halls around the red base can make it harder for the flag carrier (FC) to escape the base, while the blue base is much more open and easier for the FC to move around. Even though these might be consider subtle changes to a symmetrical map, you can see how it can affect gameplay and therefore cause players to prefer one base over another — especially in clan matches. Base Identification This may seem incredibly obvious, but needs to be stated. Make sure it is obvious for the player to tell which base they are in. There is nothing that will frustrate players more than to be confused as to their location in the map, especially which base they are in! There are a few methods to do this. The one method to NOT use is colored lighting. Making assumptions about the player’s hardware is not good to do, and colored lighting is definitely limited to certain hardware configurations. Colored texture lights are ok as the color of the texture is obvious even without being able to see the color it emits. The best and most obvious way to identify the bases is with textures. It’s easy to spot with any type of hardware setup and allows a lot of flexibility. There isn’t always a good set of colored textures to use though, so you can combine this with the CTF banners (misc_ctf_banner / misc_ctf_small_banner). These provide very well known identifiers for players to see. One way to help players orient themselves to make sure all DM start points (info_player_deathmatch) face some sort of base identification so as soon as they spawn they immediately see where they are located. Basic Map Layout While the layout of a CTF map is entirely up to the map author, the following are a few components that make up a good CTF map. Distinct bases. A wide open field with 2 flags in it may be considered (by some) a CTF map, but it won’t be much fun to play. Having two separate areas for each base normally works the best. Flag rooms. While there are some maps that really don’t have a flag room per say, most maps have something they consider to be a flag room. The goal is to have something for defenders to defend — instead of a huge base they concentrate on a smaller flag room. Choke point(s). The best maps being played right now have at least 1 choke point. Simply put a choke point is like a funnel — players coming from various rooms are “funneled” through a specific area of the map. There can be several of these, but it’s best to not have too many. Having 10 distinct, separate hallways between bases will frustrate defenders and after a while there will be nobody left but flag runners. If you want a lot of action, limit the choke points. Alternating paths. One popular technique is to inter-link the paths out of a base — that is have 2 paths out of a base join together at some point. This doesn’t have to be a choke point, but rather a hall or hole in roof/floor etc. This offers both flag carriers and defenders a way to change their path in/out of a base (useful to lose defenders, or intercept the FC). Be careful to not have too many or you’ll end up with a maze. 3-D. Quake2 is a 3d game so take advantage of this and go vertical as well as horizontal in your map designs.
Don’t force grapple. While it’s true CTF usually has a grapple, don’t make a map where it has to be used for the main path through a map. There should be paths to take where a player doesn’t need to use the grapple. It’s perfectly fine to have alternate paths or ledges etc. that require the grapple, but the main path and main weapons should be reachable via more “normal” methods.
Advanced CTF Map Making This section will cover some of the advanced topics involved in creating CTF maps. This section will not present a list of “do’s and don’ts” but rather show how your decisions as a mapper will effect how the map plays. In addition to the overall theme of balance, the goal here is to emphasis the need to consciously think about everything you do — from item placement to map/room sizes etc. Items: Choice & Placement This is by far one of the most critical areas of any map, including CTF maps. You can have the most awesome architecture, but because of poor item choices and placement the map can be terrible to play. Of course you it helps to have a nice looking map, but there are plenty of “ugly” maps out there that play great — due to the items in the map and where they are placed. To begin, let’s look at some examples of existing CTF maps to see how the items and their placement has affected gameplay. Again, the point here isn’t to say something is “right” or “wrong”, or to say one map is better than another. The goal is to educate you as a map maker how your choices affect the game. Q2CTF1 – McKinley Revival This is a very popular and well done map. If you’ve played this map you know that the Rocket Launcher (RL) is located in each base. There is also a Power Shield (PS) along with 2 cell packs and a megahealth. Having the RL only in the bases can create a situation where it is difficult to flush out a FC who is holed up in their base. This was balanced though by having the BFG (the “Drano” of weapons Having the PS located in the base, along with cells, regular armor, and megahealth allows the FC to get pretty buffed with armor/health. This will also attribute to a style of “defensive standoff” or “dual FC holdup” gameplay. There is nothing wrong with this — many people like this type of map. Again the purpose is to see how this affects gameplay. Now imagine if you moved the RLs out of the base, and had 1 or 2 located closer to middle (or leading into each base). This map would play quite a bit different if the RL wasn’t in the bases, and moving the PS out would also (although slightly less) affect the game as well. Q2CTF2 – Stronghold Opposition This is another very popular level. The flag rooms are small but have several ways in, which leads to a slightly more difficult defense than Q2CTF1. Items and their placement on this level drastically affect gameplay. In this case it’s a combination of items that combined can make for some hard-to-defeat opponents. Having the PS near flag room, along with 4 cell packs (and HyperBlaster) close at hand will allow a player to quickly accumulate 200 cells for the PS. Right outside of the flag room is a Bandolier, which will let you carry 50 more cells (for a total of 250). There are also 2 backpacks located in the middle of the map, which gives you 50 more cells as well as ups your limit to 300. So if this player, with 300 cells and the PS, happens to get the Disrupter Shield, they will be one very tough opponent. The balancing item here is the open bases/flag rooms. There really is no place for the FC to hide for any length of time. Q2CTF3 – The Smelter Another popular, and very violent, levels. This map is very similar in overall design to the popular Forgotten Mines level in Q1 CTF. A classic “two quad” map which most definitely affects gameplay. Having two quads in a level will definitely create a balance against the Power Amp, but care must be taken where the quads are placed. In The Smelter the placement of the quads are very critical. It forces defense to keep on top of their quad, or the opponent will pick it up before dropping in and causing havoc in their base. There is also not many wide open spaces, so using the quad with the RL can be dangerous to one’s health. While this map may not be everyone’s favorite, it most definitely is one of the most intense and action packed maps for Q2. 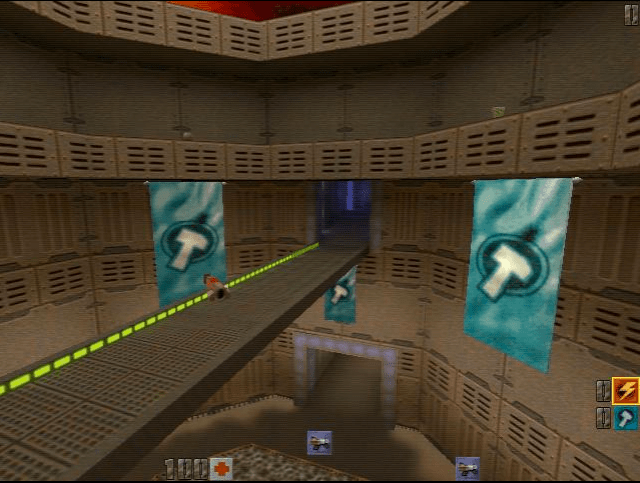
LFCTF1 – Neurotica
Fair is fair. This is one of the levels I created for the Team 3 / L-Fire CTF Map Pak (I say “I created” but actually L-Fire provided major feedback throughout the entire design process). In designing and testing this level there were some very conscious decisions made on the items in this map. Early on in the development of the map it was decided to make this a two quad level. The quad room was made a bit more important to guard as there is also two grenades and two rocket packs there. One of the major decisions made with this map was to have every dm start point (info_player_deathmatch) be within close proximity to the RL. All start points are within a few seconds of the RL, with four (per base) directly in line or above the RL. With a two quad map we knew it would be intense, so having everyone start out near an RL would only add to the insanity. In addition to the proximity to the RL, the two start points above the RL are near the Grenade Launcher (GL) which encourages even more craziness to the RL room. The other major decision with this map was to have only one PS, and put it someplace out of the way. Having two cell packs in the base would allow the player (who just went through hell and back getting the PS) to keep the PS powered up. The original map didn’t have a weapon above the flag. During testing the decision was made to move the SuperShotgun (SS) from inside the flag room to it’s current location. This allowed someone spawning above the flag room to pick up the SS before dropping in. This is a much better location for the SS, and something that wasn’t realized until testing. Neurotica isn’t for everybody though. It’s a very intense map with almost non-stop action. This can make it difficult to defend the base — in all but one (out of close to a hundred) games I’ve played on this map there are normally a large number of caps and points. The point is we consciously made design decisions to affect gameplay, and the map plays as we planned. Map Size There is an old saying, “Bigger is Better.” This normally isn’t the case with CTF maps. A lot of new CTF map authors make the mistake of creating huge maps. This is fine if you are guaranteed of having 32 players all the time, but that isn’t always the case. A more likely scenario is a server with 3-4 players on it to start off with. If they are on a huge map, they will quickly tire of the lack of action and leave. If however they are able to play (albeit a bit light on the action) then others may see people playing and join as well. There have been many cases of huge maps being “server killers” — everyone leaves. The key here is to create a somewhat smaller map, but make it feel bigger. The goal is to place your items so they will draw players to specific areas of the map. The quad is a classic example of an item that will draw players to it. With a small map you can put the quad in a big, open room so a lot of the battles can take place there. By using item placement you can draw players into the larger areas of a smaller map. One way to make a map feel big is to trick the players into thinking it’s bigger than it really is. One to do this is by having areas open to sky. This gives the illusion of more space when there really isn’t. K.I.S.S. The old saying Keep It Simple S….. applies for CTF maps. Having a lot of twisting hallways and traps just takes away from the game — which is to Capture The Flag. The level should not defeat the player, that’s the job of the other team. If maps are too difficult to learn or there are too many pitfalls, people will probably just give up and not want to play the map. Beta Testing There is nothing more beneficial than to test your map with real people. You can do some testing with bots, but people provide feedback. If at all possible try to round up some friends and play test your level. You’ll be amazed what will learn from some live testing. Step By Step Guide The following are the steps I go through when creating a CTF map. This is intended for the first-time CTF map maker, but others may find something of interest here. While I try to hit all the major steps I use to develop a map, some may do things differently. Develop theme. This can vary per person, but I normally think of a general look that I want. This can be as simple as a texture set or more complex like “factory” etc. Decide on texture set. This is normally part of the first step, but here I tend to look through various texture sets to come up with the basic textures I want to use. Sketch out base. For some they use paper, others visualize it and others just jump right into the editor. I’ve used all techniques, but normally opt for the latter two. I get a good picture in my head of what I want (which is easy to do as I can do this anywhere — meeting at work, zoning out on the TV, spending quality time in the bathroom etc..). I tend to start with the flag room and move out from there. The main reason for starting with the flag rooms is that, in my opinion, the flag rooms are one of the most critical areas of the map, especially how players get in and out of the flag room. It is important to initially plan on some of the entities you want as it effects the layout of the map. For example lfctf1 was planned around the Rocket Launcher (location being central in both bases, and all start points close to it). As you plan your base have an idea where you want certain items to be placed. Item placement should not be an afterthought. Prototype in editor. Once you have the basic layout for the base, do some prototypes in the editor. At this stage don’t worry too much about final textures — the goal is to produce something so you can actually see it in-game. The purpose is to get a good idea of the size of things when you run through as a player. Finalize flag room and base layout. After your prototypes you should have a good idea of how the flag room and base should look. Finish the layout for these areas. Some thought of textures should come in now as texturing can sometimes force you to split brushes (which increases your r_speeds). While doing these layouts you will want to do some full vis compiles to check on your r_speeds. If you plan on using light textures, you will need to play for an increase in r_speeds for these as well. Finish texturing the flag room and base. This can, and should, take some time. You want to make sure you have a nice flow, and not drastic changes of textures. Use colored textures to help identify the base. If using texture lights (what I do) then place them now as well and do some light (qrad) compiles to see how it all looks. Once you finish the flag room and base copy this .map file to a new file name (to be used in step 9). Do final entity placement in base. This includes weapons, ammo, armor, flags, ctf banners, dm start points and team start points. Hopefully you have a good idea where everything goes by now — as this should be part of step 3. Prototype middle (crossover) area. If you editor doesn’t support regions (QERadiant does) then you can do this part in a new map file. Make sure the middle area is centered at 0,0 in your editor. Verify r_speed values are good in the middle area. The first thing to check is r_speeds of the middle area alone, then with the first base “attached”. Since the middle area normally looks into both bases this could be considerably high. At this point you only have one base hooked up, so you will need to compensate for the second base. The best way to make sure you r_speeds will be good enough is to stand in the middle, against a side wall. With your back to the wall and the completed base in your side view (and the future second base location is also in view) make sure the r_speeds are low and can handle an increase once the second base is added. Since the middle area will normally have lots of action you will want to keep the r_speeds as low as possible. Create the second base. Now comes the fun part. This will depend on your editor, (I use QERadiant) but hopefully you can do something similar with your editor. In step 6 you saved off your first base in a separate file — load that into your editor now. The first step is to rotate the entire map 180 degrees on the Z axis. I found it’s best to do a 180 degree turn rather than two 90-degree turns. The problems most editors have (some much worse than others) is that with each rotation textures can get skewed/shifted. Doing a single 180 degree rotation lessons the amount over two 90 degree rotations. Once the base is rotated, replace the colored textures. If your editor does not have a texture replacement function, you can do it manually or be brave and open up your map file in a texture editor and do a global search/replace of the texture names. Adjust textures. After the rotation some textures will be mis-aligned. This is a slow process, but you need to walk through the entire map and fix any textures that have “slipped”. Tie it all together. After finishing the second base it’s time to pull it into your main map file. Some editors support importing another map, while others you’ll need to copy and paste the second base into your main map file. Normally after doing this the new brushes are all selected — while they are selected move them into final position. If your editor supports groups (in QERadiant you select the func_group entity) you may want to group all these brushes in case you need to do more movements later. Once everything is in place you’re ready to test it. NOTE: if you left the middle section closed off (i.e. not open to the new base yet) then you obviously need to cut openings to the new base. Verify r_speeds are good with both bases intact. Beta test and fine tune map if needed. Wrap Up While there is no guaranteed methods to a successful CTF map, hopefully this guide will help you to avoid some things that will make a bad CTF map. While success is measured differently by everyone, if people play your map more than once, you are successful. 
About The Author I started creating maps for Quake1 back in June of 1997. My first CTF map was Test For Echo and was part of the Quake1 ThunderWalker 4.0 release. For Quake2 I have a couple DM maps, but mostly focused on CTF maps. I have two maps in ThunderWalker 2, three maps in Capture! (and because of this, the Extremities CD) and two maps in the L-Fire CTF Map Pak (one of which, lfctf1 – Neurotica, is also in Expert CTF). Credits I’d like to thank the following people: Team 3 – for feedback — and just being an awesome group! 
|

Donde Quake 2?
Archiving the history of the video game Quake 2: created by id Software; customized by the Quake 2 community.

 in the water. The problem comes in when you have a mod that allows this weapon to be disabled (like L-Fire CTF). While it’s not impossible to flush out the FC, if you spawn in the middle of the map it will take some time to get to your base, get the RL then go back to the other base. NOTE: I’m not saying the RL is the only weapon that players use, but it is probably the most popular — especially for distanced. The RailGun (RG) can also be used, but it too is located only in the bases.