

Cacophony By Rich “Publius” Tollerton, Charles “Myrkul” Kendrick from the Expert Quake Team
Review by DRiVEN[D!]

Here is some fun reading about everyone’s favorite map from the internet archive of Boomstick Joint, Week of 15 November 1998:
https://web.archive.org/web/20010620102458/http://www.captured.com/boomstick/
Overall impression
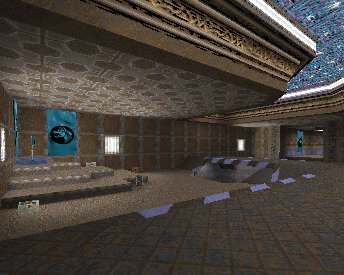
And then they asked me “Why do you like the blue team more?”… I saw this map on 3Dfx, and it looks quite damn nice. The red base looks cave like with the rock and ground textures. The roof is supported with a few beams that span across the flag room  As you move through the corridors, the red lights switch over to blue and a little bit further on the cave like corridors switch over to a nice man built base with plenty of cool blue lights. Then you come to the blue base with a bit of water and a nice catwalk around the flag. The theme of this map seems to be something like Mines vs Techs :]

Now I saw in the blue base a texture that looks like construction paper (blue and black stripes), now I want to ask you people please NOT to use that texture. Why? Becuase if you do, I automatically have to give you a good review. I love that texture! I LOVE IT! If you don’t believe me, just go and check out our clan page, then you will believe me. Oh yes. I know you will. Ok I wont give you a good review just about that texture, but I do love it

There is plenty of ammo scattered throughout the map which will certainly sustain you for long battles. The map is quite small and damn fast paced. There is a series of corridors going through the map which makes for plenty variations of the capping routes. Exept for the catwalks in the blue base, there is no level over level architecture in the map. This does not comprimize anything, and it is kind of fun to play on a map that is not so hard to memorize.
Layout
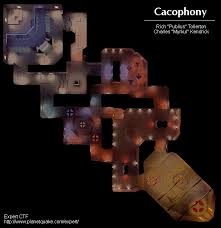
The layout of the map is very easy to remember and with the help of that neat overhead view of the map in the first screenshot, you can’t go wrong. The red flag room has a few obstructions in it that can serve as bunkers if you need cover from some mad Chaingunner. The red flag room is also quite big and trying to hit someone with a rocket in the other end of the room, can be pretty hard. Out of the flag room leads two corridors that each leads to the approach room. The approach room only has two pillars in it and also a small catwalk in the middle. There are also three exits in the approach room. Two of them are level with the rest of the room, and the other on is a hole in the floor. You can get out of this hole without a grappling hook as there is a stairway, not a ladder that goes out of it. The stairway looks a lot like a ladder, but it isn’t! It’s pretty neat. I want to this in more maps you hear? From there you come into the middle rooms. There are two of these and in them the red lights go over to blue. The one room has a few ramps in it while the other is level and only has a big pillar in the middle. From there you start to go into the blue base as the floor is replaced by concrete and there are a few computers here and there in the walls. From the blue approach room goes two corridors to the blue flag room. The blue flag room looks real c00l and has two catwalk around the flag. These catwalks are real nice to stand on and defend the flag from as they give you a nice tactical advantage over your lower opponents. Below these catwalks are a bit of water if your feet gets dirty. This water is not deep, but it can help a bit if someone is hiding there and you didn’t hear him and suddenly you hear a peculiar splash.

Items
There is tons of ammo throughout the map and with that, also lots of guns, but not all of them! There is no BFG, Hyper Blaster or Machineguns in the map. Items are placed almost simetric through the map which makes it so much fairer for bots sides.
Starting in the blue base this time, there is something that, mmm… Well it looks like a… It seems to be a umm.. It’s aaaa.. It’s a flag! Ok in the blue flag room is a flag! A blue one please note! With that is a Rocket launcher on the catwalk and a SSG just below it in the water. There is also two boxes of rockets, two Jacket Armors, shells, slugs and plenty of health. In the blue approach room is a Railgun, a shotgun and a RL which is nice for if you happen to respawn close to the blue base and you want to make a quick assault on them with some heavy weaponry. There is also plenty of ammo and health in the room. Going on to the middle rooms, you come across some Combat Armors which is the best armor found on the map, and also quite a bit of ammo and health. There is also two Grenade Launchers, a SSG and a Chaingun. As you move along to the red approach room you come across another SSG, a shotgun, a RL, a Railgun, lots of health and ammo. In the red flag room is another RL, a SSG and tons of health and ammo. HOLY COW! THIS MAP IS FILLED WITH GUNS!! This map can support big games, despite it’s size.
There is no Quad, Body Armor, or anything special in the map. Oh yeah, the techs seems to spawn in the flag rooms, so you will have a go at them quite early in the game.
The Offensive
Return of the Grapple Monkies! Hehe.. This map is very grapple friendly, and you should always use that to your advantage. You can never grapple enough as long as the map supports it. Here you can have tons of fun as you can grapple past the long rooms and through the corridors. Grappling around is one of the fastest ways to get around, and with the architecture of this map, you can rock! Just remeber that when you grapple, jump just before the hook hits the wall. This will help you not to get stuck on the floor and run along at normal speed. Many people doesn’t know this, but I have made it a bit of a habit, and no matter where I grapple to, I jump
Stock up and keep your armor as high as possible. If you have the Regen rune you will have some nice advantage here, but otherwise, 100 combat armor will be the highest that you will get, so when you are in a battle with those evil enemies, you must focus more on not to get hit, otherwise you are not going to live to tell your tale or to cap the flag. This map is really very fast paced and you should use this to your advantage by continually making attacks on the enemy base. Just run along and pick up a few guns here and there and try to make a impression on the enemy. This will keep the enemy’s D! low on ammo, and that can help when your team mates are getting a organized assault ready. You can try to have one guy that is skilled in evasion continually storm in the enemy base while you gear up to make the big attack.
When you have a few players by your side, always attack from both sides of the bases. Each base has two entrances, so one group goes in from the one side, and just a moment after that, the other group comes in from the other side and make a pass for the flag. You may also want to try and drag the enemy D! out of their base by just poking your head in and then popping off a few shots. If they don’t want to follow, you, you just stay there and do that and thus become a Splinter player. After a while they will get peed off and they will follow you or their O! will come by and frag you. Doh! So don’t keep this up for too long. If it does go on for a while, just radio your mate and go in at the same time. When you start your run to the enemy base, just check all the middle rooms and that to make sure that you don’t leave one corner behind and then you have a D! on your back fragging your team mates as you run. CApping routes can very nicely be weaved into something that can be really hard to follow, so it is important that you experiment with this so that you can know your way and also thay you can figure out a route that is exeptionally hard to follow.
The Defensive
Hehohiha! I like playing D! here. The O! might have most of the choises when it comes to the middle of the map, but the flag rooms were just made for me.
Red base: I like to just sit on the flag podium with my trusty old Chaingun + Strength and when someone shows their face, I open up and mow ’em down. When the ammo starts to go low, I just shift a bit to pick up some more bullets. This makes for a nice sustained defense that is very effective and keeps ppl out of your base. And while you do this, you can radio a Mobile D! in to get the guy from behind while he hides, you can just send in one of the D!s that are with you in the room to go out of the other exit and also get the guy from behind. This works great as they are always just camping there to wait for my Chaingun to run out of bullets, and when they don’t just camp, your fellow player can just retreat into the flag room where he will have backup. The Railgun also works nice if you have no more bullets cause it is easy to hit someone over the length of that room. If you are Defending from the end of the flag room where the exits are, you might rather want to use a gun like the RL or the SSG. Since the entrances are so close to each other, it isn’t likely to miss a thief comeing in from the other side. Just check where the battle is going and don’t get too distracted from your flag. Luckily there is a noise that will remind you of the flag when it is stolen so that you can still have time to turn around and pop that carrier.
Blue base: This is a more fun and a little bit trickier. The entrances to the base is farther apart from each other, but with the help of the catwalks you can keep a nice lookout over the level. If you have only 2 on D!, you can still make a pretty effective team. Put one player on the one catwalk and another on the other! (I like the sound of that This way you can cover both entrances nicely. The RL and the SSG is my main reccomendations here. Mainly because you will mostly be involved in close combat and you also have the two guns close to you. There is ammo for both of them too, so nobody can complain. Also each of the two catwalks have their own Jacket Armors, so now both D!s can have armor. When someone do come in, try to keep to your catwalk but move around as much as possible without falling down. Like this you have a tactical advantage over your opponents and you can still just check your entrance for any thieves trying to sneak in unnoticed. You can also listen to the water sounds as most thieves do not want to run over the catwalk as they will be easier to notice, so they run under it where the water it.
If you have a player to spare, always try to have a Mobile D! running around the map picking up armor and keeping stocked to resupply the in-base D! with more ammo if they need it. This guy also checks the corridors now and then for spies or anything suspicious hanging about. When you have some trouble in the base he comes in and saves the day, and he also warns the base D! of any incoming attacks and falls back if they are too big for him to handle.This guy is one of the most fun to play and is also a great help to everyone in your team.
This Allstar maps have Captured me a bit. I just might have to start and play it seriously! I AM going to add the Allstar2 maps into my overview section some time as they are so darn c00l. But anyway, for a very fun map, Cacophony scores a 7.8
