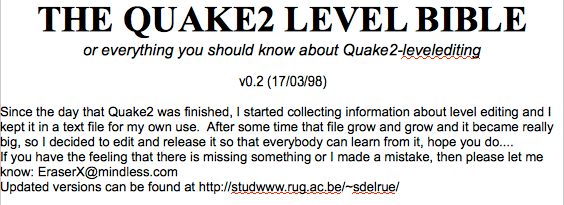

THE QUAKE2 LEVEL BIBLE
or everything you should know about Quake2-levelediting
v0.2 (17/03/98)
Since the day that Quake2 was finished, I started collecting information about level editing and I kept it in a text file for my own use. After some time that file grow and grow and it became really big, so I decided to edit and release it so that everybody can learn from it, hope you do….
If you have the feeling that there is missing something or I made a mistake, then please let me know: EraserX@mindless.com
Updated versions can be found at http://studwww.rug.ac.be/~sdelrue/
Note: this file does not contain information about entities, if you want info about them, go to
The Quake2 Workshop (http://www.quake2.com/qworkshop/)
Or
RUST (http://www.planetquake.com/rust/)
Quake2-LevelEditors:
QOOLE: http://www.qoole.com
Quark: http://www.planetquake.com/quark/
BSP: http://www.bsphq.com
Quma: http://www.frag.com/quma/
Qed: http://ourworld.compuserve.com/homepages/mtagliaferri/
QE4 Radiant: http://www.planetquake.com/quakeLab/quakeLab2/radiant.htm
Worldcraft: http://www.gamecraft.com
Deathmatchmaker II: http://www.deathmatchmaker.com
Quest 2.0: http://www.nuc.net/quest/
(*With GlideQOOLE you can view your level fullscreen and walk trough it with an excellent framerate, if you have a 3Dfx-card. Quark can use 3DFx, too.)
Mailings list
(Expect a very big mailbox when you apply to them)
QOOLE: http://www.qoole.com/maillist.html
Planet quake: http://www.planetquake.com/maillist.html
The Quake Workshop: http://www.quake2.com/qworkshop/misc/form.htm
Quma Mailings: http://www.frag.com/quma/mailinglist.htm
Compiling levels:
When you make maps, you are editing a MAPfile, but Quake2 can’t read this file. To play it, you have to compile it into BSPfiles, so Quake2 is able to load your level. To compile your levels, you should have these 3 EXEfiles: QBSP3.EXE, QRAD3.EXE and QVIS3.EXE. Put them in the same directory where you save your map. When you made your map in the editor you use, you should have a MAPfile. Open up a DOS box, go to the directory where you put it, then type
QBSP3 mylevel
Mylevel is the name of your MAPfile. This will generate (if you have no errors) a BSPfile, like this: mylevel.bsp. Now you can play this level, but you’ll see there is something missing: lights ‘n shadows, so type:
QVIS3 mylevel.
This optimizes your map so it will run much faster. You can run QVIS3 -fast mylevel (recommended for level development) so QVIS3 will run very fast, but it won’t optimize your level much. You can use QVIS3 -level N, where N is a value between 0 and 4. The higher the number, the better the optimization, and the longer it takes to finish it. For level building, you can use QVIS3 -fast mylevel, this will VIS your map fast, but it may run slow when it’s very big. Now your map is compiled with QBSP3 and QVISSED, but you still don’t have any lights. Now, do this: QRAD3 mylevel
This will make lights and shadows in your level. This also can take some time. You can use the -extra option with QRAD3: the lights will look 4 times better, but it will take 4 times longer to QRAD it. Always run QBSP3 first, then QVIS3 and then QRAD3, or you won’t have any lights.
IMPORTANT: YOU MAY NOT RELEASE MAPS WHICH AREN’T VISSED AT LEVEL4
Speeding up QBSP/QVIS/QRAD:
With these settings, the compilers will run much faster, but your level will look rawer.
QBSP3 -nodetail (nodetail doesn’t create transparent brushes)
QVIS3 -fast
QRAD3 -nopvs -chop -v
If you want to speed up QBSP3 and if you don’t want to VIS it (for architecture checking or so) you can use: QBSP3 -nodetail -nofill -notjunc. With -nofill -notjunc QBSP3 will not create a PRTfile so it will run faster, but you won’t be able to VIS your map.
Some tricks to speed things up:
Set DETAIL on to brushes that contain detail textures. The little things, like lights on the side of the wall, a display panel, etc. This will prevent Vis and Rad from taking them into account when compiling.
The other is FUNC_AREAPORTAL. Basically, you use this in conjunction with doors. When a door is closed, you don’t see what is on the other side of the door, however, qvis does and takes the calculations from one room to the other. Area portal prevents qvis from doing this, so basically you have to set it around the door to block qvis. However, you also have to have it set to be triggered to turn off, when the door is opened, otherwise it will create a gray mass to the player until they pass through it.
Hint brushes:
There is an excellent tutorial about this on http://www.planetquake.com/rust/
Starting up levels:
You should make/have a c:\quake2\baseq2\maps directory and place all your BSP-files in there, now type at the dos prompt: Quake2 +map mylevel Quake will start up your level or type in the console: map mylevel . This will start your level, too.
Converting Q1MAPfiles into Q2MAPfiles:
The file format for Q1 and Q2 is the same, so brushes will be compiled the same. But Q2 has a totally different entity-set. Plus, all the textures are different. You can convert them (sort of) if you replace all the textures and all the entities, or you can use a conversion tool, there is one at http://www.postal.ru/quake2/. This is the home of programmers who work on Quake(2)stuff, one of them is working on that conversion-tool.
Console Commands, which can be useful for Level Editing:
Noclip: now you can move everywhere in your level, trough walls etc.
r_fullbright 1/0: Set fullbright on/off
r_speeds 1/0: Set r_speeds on/off. With this you can check the speed of your level: the number in the left, should not be too high, 800 is a maximum. If you have run a VIS -level 4 on your level it will drop dramatically. If you just run QBSP on your level, it will be much higher.
Timerefresh: another way to test the speed of your level.
Map level: loads the map level, BUT, be careful, if you make a map and name it like one of the map names in the PAK0.PAKfile of Q2, and you type map that_level it will load the level out of the pakfile, not your level.
gl_showtris 1/0: (you can only use this if you have a full open/GL card. This will show how the level is made with polygons in Quake2.
gl_monolightmap: turns textures on/off
condump <filename>: dumps the current console text to <filename>
imagelist: Gives a list of all images used (textures, sky…)
info: dumps info about your map
notarget: the enemies will ignore you in single player mode
r_drawentities 1/0: shows entities or not
Making a Ladder:
Make your ladder, and put a brush before your ladder so it covers it. Add the clip texture to that brush and give it this options (apply them to all faces):
No Draw
Playerclip
Ladder
Or you can make your ladder and give it the ladder option.
Making a breakable window:
Make your window, apply ‘window’ and ‘trans33/66’ to all faces. Now apply a func_explosive to your window. Add a target_speaker with a boomysound to hear the explosion.
Some useful color values for light entities:
Black- R000G000B000
White- R255G255B255
Grey- R100G100B100
Red- R255G000B000
Green- R000G255B000
Blue- R000G000B255
Yellow- R255G255B000
Magenta- R255G000B255
Aqua- R000G255B255
Orange- R255G100B000
Hot Pink- R255G0B100
Light Green- R100G255B000
Blood Red- R100G000B000
Forest Green- R000G100B000
Midnight Blue- R000G000B100
Angles (for doors, buttons…)
east: 0
north: 90
west: 180
south: 270
up: -1
down: -2
Other values between 0 and 360 can be used, too
Light styles:
0 “Normal”
1 “Flicker”
2 “Slow strong pulse”
3 “Candle”
4 “Fast strobe”
5 “Gentle pulse”
6 “Flicker”
7 “Candle”
8 “Candle”
9 “Slow strobe”
10 “Fluorescent flicker”
11 “Slow pulse, not fading to black”
Things that causes your map to leak:
You made a hole in you level so that you can see the void surrounding it.
You put an entity outside your level.
You put an entity inside a solid brush.
You place a func_areaportal in the void.
You made 2 rooms, which aren’t joined together.
You placed an entity on 0.0.0
Tricks to help you find holes in maps:
* Use QE4(radiant), load your map-file and select point file in the file-menu. This will draw a line where the leak is.
* Put boxes on different parts of your level. Compile each time till you don’t have a leak any more. Now you can see in what part of your level the leak is.
* Put lights on maximum and place a huge box around your level, otherwise it won’t VIS. Now, go out of your level with NOCLIP in the console and look where the light shines trough.
* Run QBSP in full darkness, then walk around in your level and look where you can see the void.
* Open the LINfile QBSP3 created and check out the coordinates you find in there. The leak should be there. (QBSP3 will only create a LIN file if there is a leak)
* Quark (http://www.planetquake.com/quark/) has a very good leak seeker.
The Sky bug:
When you make a sky, and next to it you make a room, you will be able to look into that room. You can prevent this with a hint brush (brush with the hint texture) with a hint brush, you can cut of a piece of your level, so that you can’t see it. You have to place the hint brush in a hallway or something like that that connects the area with the sky and the room you can look into. You don’t have to put the hint brush next to the sky brush that won’t help.
(Tutorial about this on my site: http://studwww.rug.ac.be/~sdelrue/tutor.html)
All the surfaces-options you can apply to brushes:
Slick: slippery surface
Draw: flowing water/lava/slime
PlayerClip: prevent player going trough
MonsterClip: prevent monsters going through
Trans33: transparent brush
Trans66: same, but less transparent than trans33
Window: same as trans33/66
Light: face casts light (the color of the light is the color of the face), -don’t forget to give this face a value (defaults: 2000-8000)
Origin: instead of giving the brush the origin texture, use this, used for rotating entities
Sky: instead of using the sky textures, use this
Water: Now you can wade though this
Lava: You’ll burn when you go trough this brush
Slime: You’ll get nuked when going trough this one
Detail: QVIS will ignore this face when compiling, speeds up QVIS, use on small brushes.
Ladder: use this for ladders (DUH)
Warp: makes water/lave/slime flowing
Nodraw: invisible brush?
Flowing: scrolls a 64×64 texture. You can set the direction in the Current 0,90,180,270-box
Mist: Makes a non-solid brush you can wade through, but i won’t slow you donw (like water)
Solid: makes a solid brush (but a brush is default solid, so don’t use)
Current: (0,90,180,270, up, down): moves the player to that direction when he is in the brush
transculent: transparent?
aux: not used…
Monster: ???
Corpse: ???
The compilers and their options:
———— qbsp3 ————
usage: qbsp3 [options] MAPfile
-notjunc -nofill: qbsp3 doesn’t create a PRTfile, speeds up compiling
-nowater: qbsp3 drops the water/lava/slime brushes
-leaktest : leaktest,
-moddir <path> : if the level you compile is for a mod, so not the BASEQ2-directory ???
-gamedir <path>: if the level you compile is for a mod, so not the BASEQ2-directory ???
-nodetail: qbsp3 doesn’t create transparent brushes
-fulldetail: well, full detail, takes longer
-threads: if you have more than one CPU
-block # # -micro #
-noprune -blocks # # # #
-chop # -nocsg
-draw -noweld
-onlyents -help
-nomerge -noshare
-tmpout -glview
-nosubdiv -v
-noopt -verboseentities
———— vis ————
usage: qvis3 [options] bspfile
-threads: if running more than 1 CPU
-level 0-4: level of compiling: 0: less, fastest 4: most, slowest
-fast: fast vissing
-nosort
-v
——— Radiosity ——–
usage: qrad3 [options] bspfile
-extra: 4 times better compiling, 4 times slower
-ambient # -gamedir <path> -nopvs
-bounce # -glview -scale
-chop -help -threads #
-direct # -maxlight # -tmpin
-dump -memory -tmpout
-entity # -moddir <path> -v
-noblock
Units to Remember
The maximum distance that a player can jump is 225 units.
Maximum jump height is 42.5 units.
The maximum height that a player can fall without getting injured is 275 units.
Maximum gap between brushes so the player can fall through is 36 units.
Maximum height of a stair is 17 units.
Limits
You should keep in mind that 4000 brushes is a maximum, but you can exceed this.
When using r_speeds, you’ll see how many polygons you can see. Be sure to keep this under 1000 or your level will be buggy: grey areas and disappearing doors/buttons.. keep 600 in mind as a limit.
The maximum MAPsize is 4096 units to -4096 units. (in X, Y, Z axis)
The Worldspawn Entity:
This entity sets some vital information about your map and spawns the world.
sounds: the number of the CDtrack you want to play (2-11)
message: the message you want to display at the start of your level
sky: the sky (from unit1_ to unit9_ and space )
nextmap: the next map (sounds logical, huh)
spawnflags: this sets in what difficulty settings it should be set. (more on this later)
gravity: sets the gravity (default 800)
skyrotate: speed of the rotating sky
skyaxis: the axis how it turns (eg 0 0 1 )
The spawnflagvalues of DM and 1p easy/med/hard (skill 0/1/2 ):
An entity does not appear on / if the spanflag is set to:
Skill 1 = 256
Skill 2 = 512
Skill 3 = 1024
DM = 2048
You can combine, just add the values (eg: entity does not appear on skill 1 and DM is: 256+2048 = 2304)
Map format:
A mapfile looks like this:
{
worldspawnentity
{
brush(es)
}
}
entity //*
{
brush(es)
}
entity //**
You can use “//” to put comments in your map
The first entity is the worldspawn-entity: it spawns the world and the brushes in there are solid. Then you can have entities with brushes (doors, buttons…) (*) and entities without brushes (lights, monsters, ammo…) (**)
A brush is made out of planes, and one plane is defined out of 3 points. 3 points define one and just one plane. To define one point, there is a X, Y and Z-axis. This means there is a depth (X), a width (Y) and height (Z). 3 Direction, that’s where all the 3D-hype comes from :).
One point can look like this: (8 64 -32) This means, 8 units towards you, 64 units to the right and 32 units down. There in 3D-space you will find this point. With 3 points, you can make a plane. And with planes, you can make brushes. A plane in Quake2 will be drawn until it reach another plane of the same brush. That’s why you can’t make concave brushes in Quake2.
Z ^
|
——> Y
/
/
V X
One line of a brush looks like this:
( 0 0 18 ) ( 0 50 12 ) ( 50 0 12 ) e1u1/doorswt0 8 -8 45 1.00 1.25 1048576 9 5000
( 0 0 18 ) ( 0 50 12 ) ( 50 0 12 ) defines 3 points, in 3Dcoordinates, These 3 points define 1 plane. e1u1/doorswt0 is the directory and the name of the texture which is on that plane. (in WALformat)
8 is the X-offset
-8 is the Y-offset
45 is how much the texture is rotated
1.00 is the scale on the X-axis (how much the texture is stretched out)
1.25 is the scale on the Y-axis
1048576 9 5000 indicate the special surface options you can apply to a brush
Textures:
Textures are not kept in the BSP-file (like it was in Quake1), each texture has a separate file: a WAL-file. You can convert them into PCX-files and (or course) you can convert PCX-files into WAL-files. If you use new textures into your level, you’ll have to be sure that other people who will play it, have that texture, too. Be sure to use the Q2-palette when making your own textures. If you want more info about textures, check out this site: http://www.planetquake.com/warehouse/
Capture The Flag (CTF)
To make CTFlevels, you need to place red starts, blue starts and dmstarts. When you enter the level, you will spawn at a DM-start, when you choose a camp, you will spawn at a red or a blue start. Don’t place info_player_starts in your level. The Dmstarts in CTF don’t have that model attached to them, but red and blue starts have ..
item_flag_team1 (the red flag)
item_flag_team2 (the blue flag)
info_player_team1 (a red start)
info_player_team2 (a blue start)
misc_ctf_banner: those cool looking CTF-banners you can see in the CTF-levels. If you place it in your map, you will get a red banner. If you give it a spawnflag “1”, it will be blue.
misc_ctf_small_banner: The same as above, but smaller.
item_tech1, item_tech2, item_tech3, item_tech4: The for Tech powerups
Sounds (use this with target_speaker):
rotate/h_rot1.wav large mechanical door opening
rotate/h_rot2.wav mechanical door closing quickly
world/10_0-1.wav 10 to 1 countdown
world/airhiss1.wav air coming from a hose
world/airhiss2.wav short burst of air (sounds like a cymbal)
world/amb1.wav quiet electrical hum
world/amb2.wav fluorescent hum
world/amb3.wav very slow hum
world/amb4.wav slow hum
world/amb5.wav medium speed hum
world/amb6.wav fast hum
world/amb7.wav very fast hum
world/amb8.wav rushing air
world/amb9.wav heavy machinery
world/amb10.wav large spinning object
world/amb11.wav mechanical grind
world/amb12.wav large machines
world/amb13.wav machines outside
world/amb14.wav space sound
world/amb15.wav fusion
world/amb16.wav faster fusion
world/amb17.wav mining machines
world/amb18.wav large item spinning slowly
world/amb19.wav warble effect
world/amb20.wav spinning and slowing down
world/amb21.wav spinning sounds
world/amb22.wav spinning sounds
world/amb23.wav spinning sounds
world/amb24.wav fast fusion sound
world/battle1.wav battle sounds, bombs exploding. version 1
world/battle2.wav battle sounds, bombs exploding. version 2
world/battle3.wav battle sounds, bombs exploding. version 3
world/battle4.wav battle sounds, bombs exploding. version 4
world/battle5.wav battle sounds, bombs exploding. version 5
world/bigpump.wav water pump
world/bigpump2.wav water pump ver 2
world/blackhole.wav sound for the blackhole generator
world/brkglass.wav breaking glass
world/bubbl4.wav bubbles
world/bubl1.wav bubbles
world/bubl2.wav bubbles
world/bubl3.wav bubbles
world/comlas1.wav voice “Communications laser neutralized”
world/comp_hum1.wav computer sounds
world/comp_hum2.wav computer sounds with squawking voices
world/comp_hum3.wav different version on comp_hum2.wav
world/curnt1.wav running water
world/curnt2.wav running water ver2
world/curnt3.wav running water ver3
world/dataspin.wav voice “data spinner reprogrammed”
world/deactivated.wav voice “deactivated”
world/dish1.wav hydraulic lift
world/drill1.wav drill sounds
world/drill2a.wav Drill moving
world/driller1.wav Drilling sounds
world/drip1.wav dripping sounds
world/drip2.wav dripping sounds ver 2
world/drip3.wav dripping sounds ver 3
world/drip_amb.wav ambience dripping sound
world/dr_long.wav large mechanical door opening
world/dr_short.wav smaller mechanical door opening
world/electro.wav electricity sound
world/explod1.wav explosion
world/explod2.wav explosion ver 2
world/fan1.wav large fan sound
world/flesh1.wav fresh meat sound
world/flesh2.wav fresh meat sound ver 2
world/flyby.wav airplane flying overhead ver0
world/flyby1.wav airplane flying overhead ver1
world/flyby2.wav airplane flying overhead ver2
world/flyby3.wav airplane flying overhead ver3
world/force1.wav forcefield
world/force2.wav forcefield ver2
world/force3.wav forcefield ver3
world/fusein.wav power up
world/fuseout.wav power down
world/incoming.wav voice “incoming airstrike”
world/klaxon1.wav alarm siren – slow
world/klaxon2.wav alarm siren – fast
world/land.wav something hollow hitting the ground
world/laser.wav laser sound
world/lashum1.wav laser humming sound
world/lasoff.wav laser turning off
world/lava1.wav bubbling and hissing lava
world/lite_on1.wav lights turning on
world/lite_on2.wav lights turning on ver2
world/lite_on3.wav lights turning on ver3
world/lite_out.wav lights out
world/l_hum1.wav light hum
world/l_hum2.wav light hum ver2
world/mach1.wav gear and chain sound
world/mach2.wav same as mach1.wav but twice as long
world/mach3.wav gear and chain with a different sound
world/mov_watr.wav moving water
world/pilot1.wav voice “We have a fix on target but no lock, …”
world/pilot2.wav voice “Target is green …”
world/pilot3.wav voice “We need some on the ground …”
world/pump1.wav large power pump
world/pump2.wav cheap power pump
world/pump3.wav large power pump, sounds like a turbine
world/pumping.wav voice “pumping system activated”
world/pyramid.wav sound of the pyramid opening up
world/quake.wav earthquake sound
world/radio2.wav radio static
world/radio3.wav radio static ver2
world/reactor.wav voice “reactor core exposed”
world/redforce.wav voice “red force fields deactivated”
world/ric1.wav bullets bouncing off the walls
world/ric2.wav bullets bouncing off the walls ver2
world/ric3.wav bullets bouncing off the walls ver3
world/rocks1.wav small falling rocks
world/scan1.wav computer scanning sound
world/short1.wav electrical short-circuit
world/spark1.wav electrical spark
world/spark2.wav electrical spark
world/spark3.wav electrical spark
world/spark5.wav electrical spark
world/spark6.wav electrical spark
world/spark7.wav electrical spark
world/steam1.wav steam being released
world/steam2.wav steam being released ver 2
world/steam3.wav water hitting a hot item and turning to steam
world/stp_water.wav water swish
world/tele1.wav teleporting sound
world/train1.wav moving conveyor
world/train2.wav train stopping
world/turbine1.wav turbine sound
world/uplink2.wav voice “communications uplink established”
world/ventsys.wav voice “ventilation systems activated”
world/voice1.wav voice “All pods launched”
world/voice10.wav voice “All personnel …”
world/voice11.wav voice “Established communications”
world/voice3.wav voice “remaining firing teams …”
world/voice4.wav voice “reporting 80% failing bio signs”
world/voice5.wav voice “All squad leaders coordinate with sister teams”
world/voice6.wav voice “Any squad leaders … fall back “
world/voice7.wav voice “Reporting 95% failing vital signs”
world/v_bas1.wav voice “EOD confirms bridge is down”
world/v_bas2.wav voice “Last recon confirms access through sewer”
world/v_bas3.wav voice “Possible camo in sector …”
world/v_bas4.wav voice “recon established … heavy fortification “
world/v_bas5.wav voice “copy that recon Charlie”
world/v_bas6.wav voice “greens we are at …”
world/v_cit1.wav voice “Locate enemy data device”
world/v_cit2.wav voice “We have destroy order on communications laser”
world/v_cmd1.wav voice “We have destroy order on central computer”
world/v_cmd2.wav voice “We have target confirmed … blackhole gen.”
world/v_fac2.wav voice “troops being disassembled” (stuttering)
world/v_fac3.wav voice “someone shut down that place”
world/v_gun1.wav voice “destroy big gun”
world/v_gun2.wav voice “evacuate big gun area”
world/v_war1.wav voice “destroy enemy supply train”
world/water1.wav running water – small stream
world/wind2.wav wind rushing
world/xian1.wav dance music
world/xianbeats.wav drum sounds for the music
world/x_alarm.wav sounds like klaxon alarm
world/x_light.wav light breaking
world/yelforce.wav voice “yellow force field deactivated”
insane/insane1.wav voice “It hurts”
insane/insane10.wav voice “The horror”
insane/insane11.wav thud
insane/insane2.wav voice “Let me out”
insane/insane3.wav voice “Make it stop” low voice
insane/insane4.wav voice “Make it stop” higher voice
insane/insane5.wav voice “arrrghwaaaa”
insane/insane6.wav voice “Kill me now”
insane/insane7.wav voice “aaaaaaaaargh”
insane/insane8.wav voice “It hurts” – slow
insane/insane9.wav voice “Help!”
Distribute your level:
When you finished your level, made a txt-file and zipped it up, then you can upload it to ftp://ftp.cdrom.com/pub/quake2/incoming/. You have to upload your zipfile (with level and TXTfile) and the textfile unzipped. BUT, before you decide to upload it, be sure that it’s worth seeing….
http://www.fortunecity.com:80/underworld/redalert/239/bible.html